Free Programming Website

Free Programming Website www.sourcecodehub.com

Tuesday, August 12, 2014

STFORUM.COM free asp.net project with source codes

STFORUM.COM   free asp.net project with source codes

This is a web application developed in ASP.NET batch started on 27th May,2003. It is based on Online Forum concept where registered users can post questions and other registered users can reply to the posted questions.
This application is to be added to www.srikanthtechnologies.com either as-it-is or with some minor modifications.
This application incorporates the following features of ASP.NET:
  • Code for application events using Global.asax
  • Form-based security and relaxing security for a directory so that anonymous users can access it
  • Data Access - SQL Server is backend
  • Calling stored procedure
  • Confirming user's registration by sending mail to user
  • Uses controls such as DataGrid and Repeater
  • Web services
  • Uses Middle-tier objects , which are accessed from ASP.NET Pages
Download source code. Unzip the STFORUM.ZIP to create STFORUM directory. Create a virtual directory STFORUM that points to the directory STFORUM on the disk.

Customer Relationship Management free asp.net project with source codes


Customer Relationship Management  free asp.net project with source codes

This is a typical CRM application to store and perform various operations related to customers. It allows user(employees of the company) to store details of customers and their appointments. It also provides required documents to be viewed by customers.

This also provides users the option to cancel/modify and appointment. Users can search for customers and provide remarks regarding their
appointment with customer.


Technologies and Products used

  • ASP.NET 2.0
  • C# language
  • Visual Web Developer 2005 Express Edition
  • SQL Server 2005 Express Edition

Steps to download, deploy and run this project

The following are the steps to related to be taken to run the existing part of the application:
  1. Download crm.zip and unzip it into any directory in your system. (For example if you extract to d:\ then it will create a directory CRM in d:\)
  2. Open Visual Web Developer 2005 Express Edition.
  3. Open the project from the directory into which you extracted project.For example, d:\crm
  4. Goto Solution Explorer and make default.aspx the startup page.
  5. Run project from VWD 2005 Express Edition.
  6. Change the path used in web.config and Database.cs as it refer to the path of the database file.
  7. You should see login.aspx page.

Online Tenders free asp.net project with source codes


Online Tenders  free asp.net project with source codes

This application allows contractors who are interested in filing tenders for various jobs related to the company. Each contractor is given a unique id for login and other operations. Contractor logs in with this id and files tenders for jobs he would like to handle.
Contractor can modify/delete his tenders. He can also search for jobs based on location, duration etc.
This provides typical users option like forgot password, registartion, change password and change profile.

Technologies and Products used

  • ASP.NET 2.0
  • C# language
  • Visual Web Developer 2005 Express Edition
  • SQL Server 2005 Express Edition

Steps to download, deploy and run this project

The following are the steps to related to be taken to run the existing part of the application:
  1. Download tender.zip and unzip it into any directory in your system. (For example if you extract to d:\ then it will create a directory tenders in d:\)
  2. Open Visual Web Developer 2005 Express Edition.
  3. Open the project from the directory into which you extracted project.For example, d:\tenders
  4. Goto Solution Explorer and make default.aspx the startup page.
  5. Run project from VWD 2005 Express Edition.
  6. Change the path used in web.config and Database.cs as it refer to the path of the database file.
  7. You should see login.aspx page.

Intranet Messaging free asp.net project with source codes


Intranet Messaging  free asp.net project with source codes

This is an intranet application used to send messages to other users of the same system. It allows users to send messages with attachment, receive messages, search for users, and maintain address book.

Technologies and Products used

  • ASP.NET 2.0
  • C# language
  • Visual Web Developer 2005 Express Edition
  • SQL Server 2005 Express Edition

Steps to download, deploy and run this project

The following are the steps to related to be taken to run the existing part of the application:
  1. Download messaging.zip and unzip it into any directory in your system. (For example if you extract to d:\ then it will create a directory messaging in d:\.
  2. Open Visual Web Developer 2005 Express Edition.
  3. Open the project from the directory into which you extracted project.For example, d:\messaging
  4. Goto Solution Explorer and make default.aspx the startup page.
  5. Run project from VWD 2005 Express Edition.
  6. Change the path used in web.config and Database.cs as it refer to the path of the database file.
  7. You should see login.aspx page.

VizagRealEstate.Com free asp.net project with source codes


VizagRealEstate.Com free asp.net project with source codes

This is a website to allow users to provide details of their properties that are for sale. It also allows users to search for properties that are for sale. Users can also add their requirements regarding the property they want to buy.

Technologies and Products used

  • ASP.NET 2.0
  • C# language
  • Visual Web Developer 2005 Express Edition
  • SQL Server 2005 Express Edition
  • CMailServer

Steps to download, deploy and run this project

The following are the steps to related to be taken to run the existing part of the application:
  1. Download vizagrealestate.zip and unzip it into any directory in your system. (For example if you extract to d:\ then it will create a directory vizagrealestate in d:\.
  2. Open Visual Web Developer 2005 Express Edition.
  3. Open the project from the directory into which you extracted project.For example, d:\vizagrealestate
  4. Goto Solution Explorer and make default.aspx the startup page.
  5. Run project from VWD 2005 Express Edition.
  6. You should see login.aspx page.
  7. You can start by creating a new user or user existing users in USERS table of the database.

Contracts Management Tool free asp.net project with source codes


Contracts Management Tool  free asp.net project with source codes

This application is used by a consulting company to manage its contracts between clients and candidates. It also helps to keep track of requirements of the clients and searching for suitable candidates for a requirement.

Technologies and Products used

  • ASP.NET 2.0
  • C# language
  • Visual Web Developer 2005 Express Edition
  • SQL Server 2005 Express Edition

Steps to download, deploy and run this project

The following are the steps to related to be taken to run the existing part of the application:
  1. Download cmt.zip and unzip it into any directory in your system. (For example if you extract to d:\ then it will create a directory cmt in d:\.
  2. Open Visual Web Developer 2005 Express Edition.
  3. Open the project from the directory into which you extracted project.For example, d:\cmt
  4. Goto Solution Explorer and make default.aspx the startup page.
  5. Run project from VWD 2005 Express Edition.
  6. You should see login.aspx page.

Library Management System free asp.net project with source codes


Library Management System  free asp.net project with source codes

This web application is used to handle typical operations in a library system. This application is developed for librarians. Issuing book, returning book, adding member, and searching for books are some of the major operations of this application.

Technologies and Products used

  • ASP.NET 2.0
  • C# language
  • Visual Web Developer 2005 Express Edition
  • SQL Server 2005 Express Edition

File Structure

The following is the directory structure of this application.
exam
 |- App_Data
 |    |-Database.mdf
 |- App_Code
 |    |-Database.cs
 |- App_Themes
 |    |-style.css
 |- all
 |    |-LibraryService.asmx
 |- photos (this directory contains .jpg files of members)
 |- default.aspx
 |- login.aspx
 |- addtitle.aspx
 |- addmember.aspx
 |- Masterpage.master
 |- memberinfo.aspx
 |- members.aspx
 |- changepassword.aspx
 |- deletemember.aspx
 |- issue.aspx
 |- returnbook.aspx
 |- memberslist.aspx
 |- searchbooks.aspx
 |- web.config
 |- web.sitemap
 |- updatemembers.aspx
 |- logout.aspx

Operations and related files

The following table lists operations and associated objects and files.
Operation Files
Login login.aspx
Logout logout.aspx
Delete Member deletemember.aspx
Master page of all Masterpage.master
Home Page Default.aspx
Change password changepassword.aspx
Add Title addtitle.aspx
Add Member addmember.aspx
Iseue of book issue.aspx
Return of book returnbook.aspx
Search books searchbooks.aspx
Update Members updatemembers.aspx
Member Information memberinfo.aspx
List of books books.aspx

Structure of Tables

USERS Table

uname - varchar(10)
pwd - varchar(10)
fullname - varchar(30)

SUBJECTS Table

subcode - varchar(10)
subname - varchar(30)
di - datetime

MEMBERS Table

mid - int
mname - varchar(30)
depositamt - int
djoin - datetime
email - varchar(40)
occupation - varchar(50)

TITLES Table

tid - int
title - varchar(30)
subcode - varchar(10)
authors - varchar(50)
price - int
dp - datetime
publishers - varchar(30)
status - char(1)

ISSUES Table

tid - int
mid - int
di - datetime
issuedby - varchar(10)

RETURNS Table

tid - int
mid - int
di - datetime
dr - datetime
issuedby - varchar(10)
returnedto - varchar(10)
fineamt - int

Steps to download, deploy and run this project

The following are the steps to related to be taken to run the existing part of the application :
  1. Download lm.zip and unzip it into any directory in your system. (For example if you extract to d:\ then it will create a directory lm in d:\.
  2. Open Visual Web Developer 2005 Express Edition.
  3. Open the project from the directory into which you extracted project.For example, d:\lm
  4. Add SQL Database file to your project and create necessary tables as shown above.
  5. Create issuebook and returnbook procedures as shown below.
    ALTER PROCEDURE IssueBook
     (
     @tid int,
     @mid int,
     @di  datetime,
     @issuedby varchar(10)
     )
    AS
    declare @nbooks int
    /* check titles availablity */
    
    if  not exists( select * from titles where tid = @tid and status  = 'a')
     begin
       raiserror('Title is not present or not available',15,1)
       return
     end
    
    /* check members availablity */
    if  not exists (select * from members where mid = @mid )
      begin
       raiserror('Invalid member id!',15,1)
       return
     end
    
    
    ALTER PROCEDURE ReturnBook
     (
     @tid int,
     @dr datetime,
     @user  varchar(10)
     )
    AS
    declare @fine int
    declare @mid int
    declare @issuedby varchar(10)
    declare @di datetime
    
    
    /* check tid is valid */
    if not exists (select * from issues where tid = @tid)
      begin
        raiserror('Title is not in the issued titles!',15,1)
        return
      end
    
    /* calculate fine */
    select  @fine=case
              when datediff(dd,di,getdate()) > 15 then datediff(dd,di,getdate())-15
              else 0
             end
    from issues where tid = @tid;
    
    select @mid = mid, @di = di, @issuedby=issuedby
    from issues where tid = @tid;
    
    /* insert a row into returns */
    
    begin tran
    insert into returns
      values(@tid,@mid,@di,@dr,@issuedby,@user,@fine);
    
    delete from issues where tid = @tid;
    
    update titles set status ='a'
    where tid = @tid
    
    commit tran
    
    
  6. Goto Solution Explorer and make default.aspx the startup page.
  7. Run project from VWD 2005 Express Edition.
  8. You should see login.aspx page.

School Projects free asp.net project with source codes

School Projects  free asp.net project with source codes

These projects were developed with SQL Server 2000 as the back-end and ASP.NET as the front-end. Code was written in Visual Basic.Net and Visual Studio.Net was used to develop the application. These projects were developed in an ASP.NET batch as classroom projects ( to show how to consolidate various topics to develop a complete project).
This project is consisting of two projects, which are:
  • A website for parents of the students to get information about their childern.
  • An intranet application for administration staff to feed marks, handle complaints etc.

How do you run?

You have to follow the steps given below to run these projects - Myschool and MySchoolAdmin.

  1. Download school.zip into your system.
  2. Unzip school.zip using WinZip.
    You get two directories - MySchool and MySchoolAdmin .
  3. Create two virtual directories one for MySchool and another for MySchoolAdmin. The virtual directories must point to physical directories into which you extracted the school.zip file.
  4. Set default page in IIS for myschool virtual directory as home.aspx.
  5. Connect to SQL Server as user sa.
  6. Create a database in SQL Server - CREATE DATABASE MYSCHOOL .
  7. Make myschool database the current database by using - USE MYSCHOOL command.
  8. Create tables required for these applications by running CREATE TABLE commands that are found in the file tables.txt in myschool directory.
  9. Insert some sample data into tables
  10. Open the required application in Visual Studio.Net 2003 and run it.

Note : Some of the operations are not implemented. Students are expected to write code for those operations. They are left as assignments to students.

VDCA free asp.net project with source codes


VDCA  free asp.net project with source codes

This is an intranet application that allows staff of VDCA(Visakhapatnam District Cricket Association) to enter details of teams, players, matches and statistics of local league matches.

Major Operations

The following are the major operations of this application.
  • User logs into site with username and password
  • Adding details of new team
  • Adding details of new player
  • Adding details of a match
  • Adding batting details of a match
  • Adding bowling details of a match
  • Modifying the details of teams
  • Modifying the details of players of a team
  • Allowing user to change password
  • Displaying all matches
  • Displaying the Scoreboard of a match
  • Displaying the details of players of a team.
  • Search for matches
  • Providing Webservice

Technologies and Products used

  • ASP.NET
  • .Net Framework 1.1
  • Visual Studio.Net 2003
  • SQL Server 2000
The following table lists operations and associated objects and files.
Operation Files
Login login.aspx
Home Page home.aspx
Adding Team addteam.aspx
Adding Player addplayer.aspx
Adding Match addmatch.aspx, AddMatch Stored Procedure
Adding Batting Details addbatting.aspx
Adding Bowling Details addbowling.aspx
Searching For matches search.aspx
Displaying all matches allmatches.aspx, GetFirstTeam and GetSecondTeam stored functions
Change Password changepassword.aspx
Logout logout.aspx
Default Page default.aspx
Modify Teams modifyteam.aspx
Players of a team teamplayers.aspx
Modifying details of a players of a team modifyplayers.aspx (not included)
Scoreboard of a Match scoreboard.aspx, batting.aspx, bowling.aspx
Creating required Tables tables.txt
Creating ADDMATCH stored procedure addmatch.sql
Creating GETFIRSTTEAM stored function getfirstteam.sql
Creating GETSECONDTEAM stored function getsecondteam.sql
Configuration Details web.config
Pictures related to players JPG files in IMAGES directory.
Web Service all\WSVdca.asmx
Configuration of Web Service all\web.config
The following are the steps to related to be taken to run the existing part of the application :
  1. Download vdca.zip and unzip it into C:\INETPUB\WWWROOT directory (assuming Windows is installed in C drive) li>Connect to SQL Server and create VDCA database as follows:
    CREATE DATABASE VDCA
  2. Make VDCA the current database by giving the following command
    USE VDCA
  3. Create required tables using TABLES.TXT file and also insert some data into USERS table.
  4. Start IIS and create a virtual directory with the name VDCA and make it refer to physical directory C:\INETPUB\WWWROOT\VDCA
  5. Open Visual Studio.Net 2003 and open the project from C:\INETPUB\WWWROOT\VDCA.
  6. Build the project.
  7. Invoke IE and give the following URL:
    http://localhost/vdca
    It should display Login Page. Login in with user name and password that inserted into USERS table.

Groups free asp.net project with source codes


Groups  free asp.net project with source codes

This is an intranet/internet application that allows users to share files, messages, and links.

Technologies and Products used

  • ASP.NET
  • .Net Framework 1.1
  • Visual Studio.Net 2003
  • SQL Server 2000

Operations and related files

The following table lists operations and associated objects and files.
Operation Files
Login login.aspx
Home Page default.aspx
Search for groups searchgroups.aspx
Join a group joingroupform.aspx, joingroup.aspx
Channge password changepassword.aspx
Creating new group creategroup.aspx
Modify groups managegroups.aspx
Group home grouphome.aspx
List of messages messages.aspx
Post new message postmessage.aspx
Displaying message details message.aspx
List of files file.aspx
Upload new file addfile.aspx
Creating required Tables tables.txt
Creating CREATEGROUP procedure sp_creategroup.sql
Creating DELETEGROUP procedure sp_deletegroup.sql
Configuration Details web.config
Files that are uploaded files folder
Web Service all\groupsws.asmx
Forgot password all\forgotpassword
Configuration file for ALL folder all\web.config
The following are the steps to related to be taken to run the existing part of the application :
  1. Download groups.zip and unzip it into C:\INETPUB\WWWROOT directory (assuming Windows is installed in C drive) li>Connect to SQL Server and create GROUPS database as follows:
    CREATE DATABASE GROUPS
  2. Make GROUPS the current database by giving the following command
    USE GROUPS
  3. Create required tables using TABLES.TXT file and also insert some data into USERS table.
  4. Start IIS and create a virtual directory with the name GROUPS and make it refer to physical directory C:\INETPUB\WWWROOT\GROUPS
  5. Open Visual Studio.Net 2003 and open the project from C:\INETPUB\WWWROOT\GROUPS.
  6. Build the project.
  7. Invoke IE and give the following URL:
    http://localhost/groups
    It should display Login Page. Login in with user name and password that inserted into USERS table.

Examination System free asp.net project with source codes


Examination System   free asp.net project with source codes

This is the examination application that is part of SrikanthTechnologies.com. In the process of upgarding website - www.srikanthtechnologies.com, this project is the replacement of the current examination system. This is a project developed using ASP.NET 2.0.

Technologies and Products used

  • ASP.NET 2.0
  • C# language
  • Visual Web Developer 2005 Express Edition
  • SQL Server 2000

File Structure

The following is the directory structure of this application.
exam
 |- App_Code
 |    |-DBUtil.cs
 |    |-Examination.cs
 |    |-Question.cs
 |- App_Themes
 |    |-all
 |    |  |-all.css
 |    |  |-all.skin
 |    |-dark
 |       |-all.css
 |- all
 |    |- forgotpassword.aspx
 |    |- newuser.aspx
 |    |- all.master
 |
 |- login.aspx
 |- changepassword.aspx
 |- examination.aspx
 |- takeexam.aspx
 |- main.master
 |- previousexams.aspx
 |- reviewquestions.aspx
 |- default.aspx
 |- showresult.aspx
 |- tables.sql
 |- Web.config

Operations and related files

The following table lists operations and associated objects and files.
Operation Files
Login login.aspx
Master page main.master
Master page for annonymous user all.master
Home Page default.aspx
change password changepassword.aspx
Exams History previousexams.aspx
Select subject takeexam.aspx
Examination examination.aspx
Showing results showresult.aspx
Review of questions reviewquestions.aspx
Forgot password forgotpassword.aspx
Registration of new user newuser.aspx
The following are the steps to related to be taken to run the existing part of the application :
  1. Download exam.zip and unzip it into any directory in your system. (For example if you extract to d:\ then it will create a directory exam in d:\ . li>Connect to SQL Server and create EXAM database as follows:
    CREATE DATABASE EXAM
  2. Make EXAM the current database by giving the following command
    USE EXAM
  3. Create required tables using TABLES.TXT file and also insert appropriate data into tables.
  4. Open Visual Web Developer 2005 Express Edition.
  5. Open the project from the directory into which you extracted project.For example, d:\exam.
  6. Goto Solution Explorer and make login.aspx the startup page.
  7. Run project from VWD 2005 EE.
  8. You should see login.aspx page.

Web Master Utilities Of SrikanthTechnologies.com free asp.net project with source codes


Web Master Utilities Of SrikanthTechnologies.com  free asp.net project with source codes

This web master utilities is used for Web Master of SrikanthTechnologies.com. This allows web master (Srikanth) to keep track of activitites of the web site.

Technologies and Products used

  • ASP.NET 2.0
  • C# language
  • Visual Web Developer 2005 Express Edition
  • SQL Server 2000
  • SMTP Server

File Structure

The following is the directory structure of this application.
exam
 |- App_Code
 |    |-Database.cs
 |- App_Themes
 |    |-all
 |       |-all.skin
 |       |-styles.css
 |- all
 |    |- schedule.xml
 |    |- STServices.asmx
 |- pictures (folder)  |
 !- default.aspx
 |- login.aspx
 |- changepwd.aspx
 |- feedback.aspx
 |- Masterpage.master
 |- allusers.aspx
 |- batchrequirements.aspx
 |- examreport.aspx
 |- questions.aspx
 |- schedule.aspx
 |- sendmailtoall.aspx
 |- searchusers.aspx
 |- userinfo.aspx
 |- tables.sql
 |- Web.config
 !- web.sitemap

Operations and related files

The following table lists operations and associated objects and files.
Operation Files
Login login.aspx
Master page Master.master
Home Page default.aspx
Change password changepwd.aspx
All users allusers.aspx
Batch Requirements batchrequirements.aspx
Exam Report examreport.aspx
Bach Schedule schedule.aspx
Send Mail To All sendmailtoall.aspx
Search Users searchusers.aspx
User Info userinfo.aspx
Feedback feedback.aspx
Questions of Subject questions.aspx
Webservice For STServices all/STServices.aspx
The following are the steps to related to be taken to run the existing part of the application :
  1. Download wmu.zip and unzip it into any directory in your system. (For example if you extract to d:\ then it will create a directory wmu in d:\ .
  2. Connect to SQL Server and create wmu database as follows:
    CREATE DATABASE WMU
  3. Make wmu the current database by giving the following command
    USE wmu
  4. Create required tables using TABLES.TXT file and also insert appropriate data into tables.
  5. Open Visual Web Developer 2005 Express Edition.
  6. Open the project from the directory into which you extracted project.For example, d:\wmu
  7. Goto Solution Explorer and make login.aspx the startup page.
  8. Run project from VWD 2005 Express Edition.
  9. You should see login.aspx page.

Personal Accounting free asp.net project with source codes


Personal Accounting  free asp.net project with source codes

This web application allows users to store details regarding expenses, income, fixed deposits, mutual funds and insurace. Apart from provides required reports and searching facility, it also reminds user about maturity of fixed deposits and insurance premium policy dues.

Technologies and Products used

  • ASP.NET 2.0
  • C# language
  • Visual Web Developer 2005 Express Edition
  • SQL Server 2000
  • SMTP Server - CMaliServer

File Structure

The following is the directory structure of this application.
exam
 |- App_Code
 |    |-Database.cs
 |- App_Themes
 |    |-all
 |        |-all.css
 |- all
 |    |- forgotpassword.aspx
 !- default.aspx
 |- login.aspx
 |- changepwd.aspx
 |- allusers.master
 |- main.master
 |- addincomehead.aspx
 |- addincome.aspx
 |- adddeposit.aspx
 |- editdeposits.aspx
 |- depositsreport.aspx
 |- incomereport.aspx
 |- logout.aspx
 |- mfreport.aspx
 !- searchexp.aspx
 !- searchincome.aspx
 |- tables.sql
 |- Web.config
 !- web.sitemap
 !- unregister.aspx
 !- unregisteruser.sql

Operations and related files

The following table lists operations and associated objects and files.
Operation Files
Login login.aspx
Master page of all all.master
Master page of logged in users main.master
Home Page default.aspx
Change password changepwd.aspx
Add income head addincomehead.aspx
Add income entry addincome.aspx
Add deposit adddeposit.aspx
Search income entries searchincome.aspx
Search exp entries searchexp.aspx
Editing Deposits editdeposits.aspx
Income Report incomereport.aspx
Mutual Funds Report mfreport.aspx
Logout logout.aspx
Unregister user unregister.aspx
Register User all\register.aspx
Forgot Password all\forgotpassword.aspx
The following are the steps to related to be taken to run the existing part of the application :
  1. Download personalaccouting.zip and unzip it into any directory in your system. (For example if you extract to d:\ then it will create a directory personalaccounting in d:\ .
  2. Connect to SQL Server and create pa database as follows:
    CREATE DATABASE PA
  3. Make pa the current database by giving the following command
    USE pa
  4. Create required tables using TABLES.TXT file and also insert appropriate data into tables.
  5. Open Visual Web Developer 2005 Express Edition.
  6. Open the project from the directory into which you extracted project.For example, d:\personalaccounting
  7. Goto Solution Explorer and make login.aspx the startup page.
  8. Run project from VWD 2005 Express Edition.
  9. You should see login.aspx page.

Admin Project

This application is used by Adminstrator of Personal Accounting application to send mails and news letters to users. Follow the steps below to extract and run this application.
  1. Download paadmin.zip and unzip it into any directory in your system. (For example if you extract to d:\ then it will create a directory paadmin in d:\ .
  2. Open Visual Web Developer 2005 Express Edition.
  3. Open the project from the directory into which you extracted project.For example, d:\paadmin
  4. Goto Solution Explorer and make default.aspx the startup page.
  5. Run project from VWD 2005 Express Edition.
  6. You should see default.aspx page with menu and select required option in the menu.

Front Office Automation free asp.net project with source codes


Front Office Automation  free asp.net project with source codes

This is an intranet application used to automate operations related to a typical front-office of a training centre.
This allows a user to log in and add details of batches, students and payments. It also provides search of students, payments report, information about batches and students.

Technologies and Products used

  • ASP.NET 2.0
  • C# language
  • Visual Web Developer 2005 Express Edition
  • SQL Server 2005 Express Edition

Steps to download, deploy and run this project

The following are the steps to related to be taken to run the existing part of the application:
  1. Download FOA.ZIP and unzip it into any directory in your system. (For example if you extract to d:\ then it will create a directory FOA in d:\)
  2. Open Visual Web Developer 2005 Express Edition.
  3. Open the project from the directory into which you extracted project.For example, d:\foa
  4. Goto Solution Explorer and make default.aspx the startup page.
  5. Run project from VWD 2005 Express Edition.
  6. You should see login.aspx page.

Librarian Module free asp.net project with source codes

Librarian Module  free asp.net project with source codes

This is an intranet application that is used to by Librarian to do the following:
  • Login
  • Search for books on title and author
  • Issue books to members
  • Handle return of book
  • Generate issues report
  • Displaying book's issues history
  • Displaying member's issues history
The following are the topics of ASP.NET used in this project.
  • Asp.Net 4.0
  • C# Language
  • SQL Server 2005 Express Edition
  • Visual Studio.NET 2010
  • Layered Architecture with Presentation Layer (ASP.NET Pages) and Data Access Layer (C# Classes)
  • All database manipulations are done with stored procedures.
  • Stored procedures are accessed using classes in DAL - Data Access Layer.
  • ObjectDataSource is used in presentation layer to talk to DAL.
  • Master page and themes are used
  • Treeview and sitemap features
  • ADO.NET is used to access database
  • Forms authentication
The following are the major operations in this application.

Steps to download, deploy and run this project

The following are the steps to be taken to run the existing part of the application.
  1. Download librarianmodule.rar and unzip it into any directory in your system. For example, if you extract to c:\ then it will create a directory c:\librarianmodule. The project comes with its own database, which is Database.mdf in App_Data folder. It contains required tables and stored procedures.
  2. Open Visual Studio.NET 2008/2010
  3. Open the project from the directory into which you extracted project. For example, c:\librarianmodule
  4. Run project from Visual Studio.NET.
  5. You should see login.aspx page.
  6. The database that is present in App_Data folder contains some sample data. It has user a with password a.
  7. Test the rest of the options.

Songs.Com free asp.net project with source codes

Songs.Com free asp.net project with source codes

This website allows registered users to upload and download .mp3 songs. It allows searching for songs based on song title, singer and langauge. The following are the topics of ASP.NET used in this project.
  • Asp.Net 3.5
  • C# Language
  • SQL Server 2005 Express Edition
  • Visual Studio.NET 2008
  • Layered Architecture with Presentation Layer and Data Access Layer
  • All database manipulations are done with stored procedures.
  • Stored procedures are accessed using classes in DAL - Data Access Layer.
  • ObjectDataSource is used in presentation layer to talk to DAL.
  • DataList is used to display and delete data
  • Membership and login controls are used to implement security.
  • Master page and themes are used
  • ADO.NET is used to access database
The following are the major operations in this application.
  • User Registration
  • Login
  • Password Recovery
  • Change password
  • Home page
  • Add Song
  • List most recently added songs
  • List songs of current user
  • Delete a song
  • Search for songs
  • Logout

Steps to download, deploy and run this project

The following are the steps to be taken to run the existing part of the application. This project makes use of membership feature of ASP.NET.
  1. Download songs.rar and unzip it into any directory in your system. For example, if you extract to c:\ then it will create a directory c:\songs.
  2. Open Visual Studio.NET 2008 or Visual Web Developer 2008.
  3. Open the project from the directory into which you extracted project. For example, c:\songs
  4. Select Website->ASP.NET Configuration option
  5. Select Security tab
  6. Select Use the security Setup Wizard to configure security step by step.
  7. Select From Internet option in Step 2
  8. Click on Next button in the remaining screens and finally click on Finish.
  9. It create a database called ASPNETDB.MDF with required tables and other database components.
  10. Open the database in Server explorer or Database Explorer and create tables - SONGS with the following structure. The following tables show the structure of these tables. SONGS
    songid  int  
    title   varchar(50)
    singer  varchar(100)
    lang    char(1)
    addedon datetime,
    userid  uniqueidentifier 
    
    Note
    • Userid is linked with userid of ASPNET_USERS table.
    • Songid is an identify column that starts with 1
  11. Create the following stored procedure in the database.
    CREATE PROCEDURE dbo.AddSong(@title varchar(50),@singer varchar(100),@userid uniqueidentifier,@lang char(1))
    AS
    insert into songs(title,singer,userid,lang,addedon) values (@title,@singer,@userid,@lang,getdate());
    RETURN @@identity;
    
    CREATE PROCEDURE dbo.RecentlyAddedSongs
    AS
    select top 10 songid,title,singer,
      lang = case lang
           when 'e' then 'Englsih'
           when 'h' then 'Hindi'
           else 'Telugu'
      end,
    addedon=convert(char(8),addedon,3), username 
    from songs s inner join aspnet_users u
    on(s.UserId=u.UserId)
    Order by songid desc
    
    
    CREATE PROCEDURE dbo.SearchSongs (@title varchar(50),@singer varchar(100),@lang char(1))
    as
    if @lang='a'
     select songid,title,singer, 
      lang=case lang
        when 'e' then 'Engslish'
        when 'h' then 'Hindi'
        else 'Telugu'
      end,
      addedon=convert(char(8),addedon,3), username
      from songs s inner join aspnet_users u
      on (s.UserId=u.UserId)
      where title like @title and singer like @singer order by songid desc
    else
      select songid,title,singer, 
        lang=case lang
          when 'e' then 'English'
          when 'h' then 'Hindi'
          else 'Telugu'
       end,
       addedon=convert(char(8),addedon,3),
       username from songs s inner join aspnet_users u
       on (s.UserId=u.UserId)
       where title like @title and singer like @singer and lang=@lang order by songid desc
    
    
    CREATE PROCEDURE dbo.DeleteSong(@songid int)
    as
    delete from songs where songid=@songid
    
    
    CREATE PROCEDURE dbo.GetMySongs(@userId uniqueidentifier)
    AS
      select songid,title,singer,
        lang=case lang
         when 'e' then 'English'
         when 'h' then 'Hindi'
         else 'Telgu'
        end,
        addedon=convert(char(8),addedon,3)
        from songs
        where userId=@userId
    
    
  12. In the Application Configuration Tool, go to Application Configuration
  13. Select Configure SMTP Email settings
  14. Enter Server name as localhost and From as admin@systemname.com. Replace systemname with the name of your system
  15. Click on Save button
  16. Go to Solution Explorer and make login.aspx the startup page.
  17. Run project from Visual Studio.NET 2008 or Visual Web Developer 2008.
  18. You should see login.aspx page.
  19. Create new user using registration page and then login with that user name
  20. Test the rest of the options.

MicroBlog free asp.net project with source codes

MicroBlog  free asp.net project with source codes

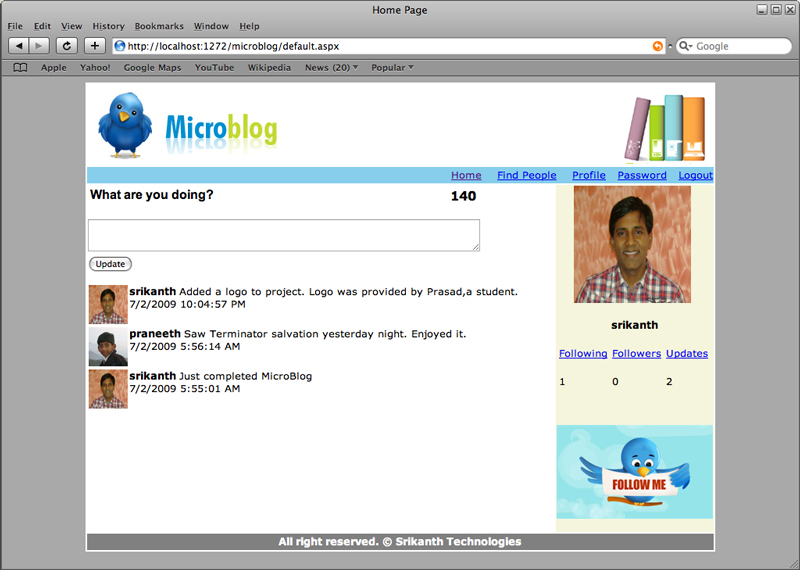
This web application is similar to twitter.com. It allows registered members to post updates, which are displayed to followers of the user. A user can have followers and friends (users who follow this user).
The following are the topics of ASP.NET used in this project.
  • Asp.Net 3.5
  • C# Language
  • SQL Server 2005 Express Edition
  • Visual Studio.NET 2008
  • Layered Architecture with Presentation Layer and Data Access Layer
  • All database manipulations are done with stored procedures.
  • Stored procedures are accessed using classes in DAL - Data Access Layer.
  • ObjectDataSource is used in presentation layer to talk to DAL.
  • DataList is used to display and delete data
  • Membership and login controls are used to implement security.
  • Master page and themes are used
  • ADO.NET is used to access database
The following are the major operations in this application.
  • User Registration
  • Login
  • Password Recovery
  • Change password
  • Home page
  • Post an update
  • List of user update
  • Delete an update
  • Finding people
  • Adding friend
  • Removing friend
  • Changing the profile of the user
  • Logout

Steps to download, deploy and run this project

The following are the steps to be taken to run the existing part of the application. This project makes use of membership feature of ASP.NET.
  1. Download MicroBlog.rar and unzip it into any directory in your system. For example, if you extract to c:\ then it will create a directory c:\microblog.
  2. Open Visual Studio.NET 2008 or Visual Web Developer 2008.
  3. Open the project from the directory into which you extracted project. For example, c:\microblog
  4. Select Website->ASP.NET Configuration option
  5. Select Security tab
  6. Select Use the security Setup Wizard to configure security step by step.
  7. Select From Internet option in Step 2
  8. Click on Next button in the remaining screens and finally click on Finish.
  9. It create a database called ASPNETDB.MDF with required tables and other database components
  10. Open the database in Server explorer or Database Explorer and create tables - MB_PROFILES, MB_FRIENDS, MB_UPDATES with the following structure. The following tables show the structure of these tables. MB_PROFILES
    userid          uniqueidentifier  (primary key)
    onlinebio       varchar(200)
    picturefile     varchar(20)
    followerscount  int
    friendscount    int
    updatescount    int
    
    Note : userid is linked with userid of ASPNET_USERS table.
    
    
    MB_UPDATES
    updateid        int    identify column (primary key)
    userid          uniqueidentifier
    test            varchar(140)
    timestamp       datetime
    
    Note : userid is linked with userid of ASPNET_USERS table.
    
    MB_FRIENDS
    userid          uniqueidentifier
    friendid        uniqueidentifier
    
    Note: userid is linked with userid of ASPNET_USERS table. friendid is linked with userid of ASPNET_USERS table. Both userid and friendid put together become primary key
    
  11. Create the following trigger for ASPNET_USERS table/li>
    CREATE TRIGGER trg_insert_profile_row
    ON dbo.aspnet_Users
    FOR Insert
    AS
    declare @userid uniqueidentifier
    
     /* insert a row into profiles table */
     select @userid = userid from inserted
     
     insert into mb_profiles values(@userid,'','default_profile',0,0,0);
    
    
  12. Create the following stored procedure in the database.
    CREATE PROCEDURE dbo.mb_addfriend(@userid uniqueidentifier, @friendid uniqueidentifier)
    AS
     begin tran
     begin try
     
       
       insert into mb_friends values(@userid, @friendid)
       
       update mb_profiles set friendscount = friendscount + 1
       where userid  = @userid;
       
       update mb_profiles set followerscount = followerscount + 1
       where userid = @friendid;
       
       commit tran
     end try
     begin catch
       rollback tran
       raiserror('Could Not Add Friend',16,1);
     end catch


    CREATE PROCEDURE dbo.mb_addupdate(@userid uniqueidentifier, @text nvarchar(140))
    as
     begin tran
     begin try
        insert into mb_updates(userid,[text],[timestamp])
        values (@userid,@text, getdate()) 
    
        update mb_profiles set updatescount = updatescount + 1
        where userid = @userid
        commit tran
    end try
    begin catch
       rollback tran
       raiserror('Could not add an update!',16,1)
    end catch


    CREATE PROCEDURE dbo.mb_deleteupdate(@updateid int)
    AS
    declare @userid uniqueidentifier
     begin tran
     begin try
     
       /* get userid for this update */
       select @userid = userid from mb_updates 
       where updateid = @updateid
       
       delete from mb_updates where updateid = @updateid
       
       update mb_profiles set updatescount = updatescount -1 
       where userid  = @userid;
       
       commit tran
     end try
     begin catch
       rollback tran
       raiserror('Could not delete update',16,1);
     end catch
    
    
    CREATE PROCEDURE dbo.mb_findpeople(@userid uniqueidentifier, @pattern  nvarchar(50))
    AS
       select au.userid, username, picturefile, onlinebio, followerscount, friendscount, updatescount
       from mb_profiles p inner join aspnet_users au on (au.userid=p.userid) 
       where au.userid <> @userid and  username like '%' + @pattern + '%' and 
            p.userid not in 
              ( select friendid from mb_friends
                where userid = @userid)


    CREATE PROCEDURE dbo.mb_getfriends(@userid uniqueidentifier)
    AS
       select au.userid, username, picturefile, onlinebio, followerscount 
       from mb_profiles p inner join aspnet_users au on (au.userid=p.userid) 
       where p.userid in 
              ( select friendid from mb_friends
                where userid = @userid)
       
    
    CREATE PROCEDURE dbo.mb_gettotalupdates(@userid uniqueidentifier)
    AS
    
     select picturefile,username, text, timestamp from mb_updates u inner join aspnet_users au on (u.userid = au.userid) inner join mb_profiles p on (u.userid = p.userid)
     where  u.userid = @userid 
     union
     select picturefile, username, text, timestamp from mb_updates u inner join aspnet_users au on (u.userid = au.userid) inner join mb_profiles p on (u.userid = p.userid)
     where u.userid in (select friendid from mb_friends where userid = @userid)
     order by  timestamp desc
    
    
    CREATE PROCEDURE dbo.mb_getupdates(@userid uniqueidentifier)
    AS
    
     select updateid,picturefile, username, text, timestamp 
     from mb_updates u inner join aspnet_users au on (u.userid = au.userid) 
        inner join mb_profiles p on (u.userid = p.userid)
     where  u.userid = @userid 
     order by timestamp desc


    CREATE PROCEDURE dbo.mb_getuserdetails(@userid uniqueidentifier)
    AS
    
      select onlinebio, picturefile, followerscount, friendscount, updatescount 
      from mb_profiles where userid = @userid


    CREATE PROCEDURE dbo.mb_removefriend(@userid uniqueidentifier, @friendid uniqueidentifier)
    AS
     begin tran
     begin try
     
       
       delete from mb_friends where userid = @userid and friendid = @friendid
       
       update mb_profiles set friendscount = friendscount - 1
       where userid  = @userid;
       
       update mb_profiles set followerscount = followerscount - 1
       where userid = @friendid;
       
       commit tran
     end try
     begin catch
       rollback tran
       raiserror('Could Not Remove Friend',16,1);
     end catch
    
    
    CREATE PROCEDURE dbo.mb_updateuserprofile(@userid uniqueidentifier,@onlinebio nvarchar(200),@picturefile nvarchar(50))
    AS
        if  @picturefile <> ''
           update mb_profiles set picturefile = @picturefile, onlinebio = @onlinebio
           where userid = @userid;
        else
           update mb_profiles set onlinebio = @onlinebio
           where userid = @userid;
    
  13. In the Application Configuration Tool, go to Application Configuration.
  14. Select Configure SMTP Email settings
  15. Enter Server name as localhost and From as admin@systemname.com. Replace systemname with the name of your system
  16. Click on Save button
  17. Go to Solution Explorer and make login.aspx the startup page.
  18. Run project from Visual Studio.NET 2008 or Visual Web Developer 2008.
  19. You should see login.aspx page.
  20. Create new user using registration page and then login with that user name
  21. Test the rest of the options.

Answers.com free asp.net project with source codes

Answers.com  free asp.net project with source codes

This website allows members to post questions and answers on different topics. It resembles Yahoo answers website. This application uses ASP.NET pages for presentation. ObjectDataSource is used to get data from Data Access Layer (DAL). Stored procedures are used to perform all important operations related to database in SQL Server.

The following are major activities in this application

  • User Registration
  • Login
  • Password Recovery
  • Posting question
  • Posting answer
  • Searching questions
  • Displaying details of a question
  • Displaying most recent questions
  • Displaying questions of current user
  • Changing password
  • Logout

Technologies and Products Used

  • ASP.NET 3.5
  • C# language
  • Visual Studio.NET 2008
  • SQL Server 2005 Express Edition
  • ADO.NET
  • Login controls - Membership
  • Stored procedures using T-SQL.
  • Identify columns for auto increment columns
  • Master pages and Themes
  • Navigation controls - Treeview, SiteMapPath etc.
  • DataBound controls such as GridView, FormView etc.
  • ObjectDataSource to get data from DAL and bind data to data-bound controls such as FormView and GridView.
  • Data Access Layer - DAL, to access database.

Steps to download, deploy and run this project

The following are the steps to related to be taken to run this application. This project makes use of membership feature of ASP.NET. So,we have to configure the website using ASP.NET Configuration tool as explained below.
  1. Download answers.rar and unzip it into any directory in your system. For example, if you extract to c:\ then it will create a directory c:\answers. The download contains all ASP.NET pages but it has NO DATABASE. We have to create database objects using ASP.NET configuration tool manually.
  2. Open Visual Studio.NET 2008 or Visual Web Developer 2008.
  3. Open the project from the directory into which you extracted project.For example, c:\answers
  4. Select Website->ASP.NET Configuration option
  5. Select Security tab
  6. Select Use the security Setup Wizard to configure security step by step.
  7. Select From Internet option in Step 2
  8. Click on Next button in the remaining screens and finally click on Finish.
  9. It create a database called ASPNETDB.MDF with required tables and other database components
  10. Open the database in Server explorer or Database Explorer and create tables using the following script. Use New Query to open query window and type the following commands in SQL Pane.
    create table categories
    (  catcode  varchar(10)  primary key,
       catname varchar(50),
       catdesc  varchar(200),
       noquestions int
    )
    
    create table questions
    (   qid   int   identity primary key,
        title  varchar(100),
        question varchar(2000),
        addedon  datetime,
        catcode  varchar(10)  references categories(catcode),
        userid     uniqueidentifier  references aspnet_users(userid)
    )          
    
    create table answers
    (   aid   int   identity primary key,
        qid   int  references questions(qid),
        answer varchar(2000),
        addedon  datetime,
        userid     uniqueidentifier  references aspnet_users(userid)
    )
    
    
    insert into categories values('music','Music','Songs , Albums etc.')
    insert into categories values('sports','Sports and Games','Sports and Games')
    insert into categories values('health','Health and diet','Health, diet and excercise')
     
  11. Create the following stored procedure in the database.
    CREATE PROCEDURE dbo.AddQuestion(@userid UniqueIdentifier, @title varchar(100),@question varchar(2000), @catcode varchar(10))
    AS
     begin tran
         insert into questions (title,question, catcode,addedon, userid)
            values(@title,@question, @catcode, getdate(), @userid);
            
         update categories  set noquestions = noquestions + 1 
         where catcode = @catcode;
         
        commit tran
       
    
    CREATE PROCEDURE dbo.GetAllCategories
    AS
       select * from categories
       order by catname
       
       
    CREATE PROCEDURE dbo.GetAnswers(@qid int)
    AS
          select aid,answer, addedon, username, a.userid
      from answers a inner join aspnet_users  u on ( a.userid = u.userid)
          where  qid = @qid
          order by  aid desc 
          
          
    CREATE PROCEDURE dbo.GetQuestionDetails
    (@qid int)
    
    AS
      select qid,title,question, c.catcode, catname, addedon, username, q.userid
      from questions q inner join categories c on ( c.catcode  = q.catcode)
      inner join aspnet_users  u on ( q.userid = u.userid)
          where  qid = @qid
          
          
    CREATE PROCEDURE dbo.GetRecentQuestions
    AS
     select top 10 qid, c.catcode,catname,title,addedon 
     from  questions  q inner join categories c
     on  (q.catcode = c.catcode)
     order by  qid desc
    
    
    CREATE PROCEDURE dbo.SearchQuestions
     (@pattern varchar(100) )
    
    AS
     select qid, c.catcode,catname,title,addedon 
     from  questions  q inner join categories c
     on  (q.catcode = c.catcode)
     where  title like '%' + @pattern + '%'  or question like '%' + @pattern + '%'
     order by  qid desc
                   
    
    CREATE PROCEDURE dbo.AddAnswer
     ( @qid int, @userid uniqueidentifier, @answer varchar(2000))
    AS
     
        insert into answers (qid,userid,answer,addedon)
          values(  @qid,@userid,@answer, getdate())
    
  12. Goto Solution Explorer and make login.aspx the startup page.
  13. Run project from Visual Studio.NET 2008 or Visual Web Developer 2008.
  14. You should see login.aspx page.

Appointments Scheduler free asp.net project with source codes

Appointments Scheduler  free asp.net project with source codes

This is a web based application that allows registered users to store appointments in web. The first advantage with this is they can access their appointments irrespective of the physical location, once they have access to Internet. The other major advantage of this application is; it notifies users about the appointments, if users want notification. The entire application is built with .Net and used the following technologies of .Net.
  • Asp.Net 3.5
  • C# Language
  • SQL Server 2005
  • Visual Studio.NET 2008
  • Layered Architecture with Presentation Layer and Data Access Layer
  • All database manipulations are done with stored procedures.
  • Stored procedures are accessed using classes in DAL.
  • ObjectDataSource is used in presentation layer to talk to DAL.
  • GridView, FormView, TreeView, Calendar and other core controls are used for interface.
  • Membership and login controls are used to implement security.
  • Master page and themes are used
  • Site navigation is done using Site Map.
  • ADO.NET is used to access database
The following are the major operations in this application.
  • User Registration
  • Login
  • Password Recovery
  • Change password
  • List of upcoming appointments
  • Adding a new appointment
  • Searching for appointments
  • List of all appointments
  • List of appointments by date
  • List of users of the system
  • Deleting an existing appointment
  • Editing details of an existing appointment
  • Logout

Steps to download, deploy and run this project

The following are the steps to be taken to run the existing part of the application. This project makes use of membership feature of ASP.NET. The download contains all tables and stored procedures created by us as well as Asp.net. So all that you have to do is download, unzip, open project in Visual Studio.Net and run login.aspx file. Here are the steps given below:
  1. Download appointments.rar and unzip it into any directory in your system. For example, if you extract to c:\ then it will create a directory c:\appointments.
  2. Open Visual Studio.NET 2008 or Visual Web Developer 2008.
  3. Open the project from the directory into which you extracted project. For example, c:\appointments
  4. Go to Solution Explorer and make login.aspx the startup page.
  5. Run project from Visual Studio.NET 2008 or Visual Web Developer 2008.
  6. You should see login.aspx page.
  7. Create new user using registration page and then login with that user name
  8. Test the rest of the options.

Appointments Administrator Application

The other application that is related to this requirement is notification application, which is run for every one hour. It finds out whether there are any appointments that need notification and sends mails to concerned users. Here are the steps related to this project.
  • Create a new project using File->New -> Project. Select Visual C# as the language and Console Application as the type of the project.
  • Enter name as appointmentsadmin
  • Rename Program.cs to AppointmentsAdmin.cs and Program class to AppointmentsAdmin
  • Write the following code in Main() method of AppointmentsAdmin class
    // program assumes database ASPNETDB.MDF at  c:\appointments\app_data folder. If that is not the case, change the path in the code.
    // It expects database to have GetAppointmentsToNotify stored
    procedure, which retrieves appointments that are to be notified.
    
    using System;
    using System.Data.SqlClient;
    using System.Data;
    using System.Net.Mail;
    using System.Threading;
    
    namespace appointmentsadmin
    {
        class AppointmentsAdmin
        {
            static void Main(string[] args)
            {
                Console.WriteLine("Sending Appointment Reminders...");
                Thread t = new Thread(SendMails);  
                t.Start();
            }
    
            public static void SendMails()
            {
                while (true)
                {
                    // connect to database
                    SqlConnection con = new SqlConnection(@"Data Source=.\SQLEXPRESS;AttachDbFilename=c:\appointments\app_data\ASPNETDB.MDF;Integrated Security=True;User Instance=True");
                    try
                    {
                        con.Open();
                        SqlCommand cmd = new SqlCommand("GetAppointmentsToNotify", con);
                        cmd.CommandType = CommandType.StoredProcedure;
                        SqlDataReader dr = cmd.ExecuteReader();
                        while (dr.Read())
                        {
                            // send mail 
                            MailMessage m = new MailMessage();
                            m.To.Add(new MailAddress(dr["email"].ToString()));
                            m.From = new MailAddress("admin@classroom.com");  // change from address accordingly
                            m.Subject = "Appointment Reminder";
                            m.IsBodyHtml = true;
                            m.Body = "Hi" + dr["username"] + "<p/> This is to remind you about the following appointment.<p/>"
                                   + "Title : " + dr["title"] + "<p/>" + "Appointment Date : " + dr["appdate"] + "<p/>Admin,<br/> Appointments.Com";
                            SmtpClient server = new SmtpClient("classroom");  // change server name accordingly
                            try
                            {
                                server.Send(m);
                            }
                            catch(Exception ex)
                            {
                                Console.WriteLine("Could not send mail to " + dr["email"]);
                            }
    
                        }
                        dr.Close();
                        con.Close();
                    }
                    catch (Exception ex)
                    {
                        Console.WriteLine(ex.Message);
                        break;
                    }
                    Console.WriteLine("Sent reminders at : " + DateTime.Now);
                    Thread.Sleep(1000 * 60 * 60);  // 60 min
                }
            }
        }
    }
    
    
  • Build the project and run appointmentsadmin.exe file from bin\Debug directory. It starts but never ends. It sends mails for every 1 hour. It uses an exclusive thread that wakes up for every one hour and sends messages.


TimeTracker free asp.net project with source codes

TimeTracker  free asp.net project with source codes

This intranet application is used to keep track of time spent by project members on different projects. It stores details regarding users, projects and time spent by members on projects - time entries.

This application uses ASP.NET pages for presentation. ObjectDataSource is used to get data from Business Logic Layer (BLL), which in turn access Data Access Layer (DAL). Stored procedures are used to perform all important operations related to database in SQL Server.

The following are major activities in this application

  • User Registration
  • Login
  • Password Recovery
  • Creation of Project
  • Adding members to project
  • Listing projects
  • Listing users
  • Generating report regarding project
  • Logging Time entries
  • Displaying projects assigned to current user
  • Logout

Technologies and Products Used

  • ASP.NET 3.5
  • C# language
  • Visual Studio.NET 2008
  • SQL Server 2005 Express Edition
  • ADO.NET
  • Login controls - Membership
  • Stored procedures using T-SQL.
  • Identify columns for auto increment columns
  • Master pages and Themes
  • DataBound controls such as GridView, FormView etc.
  • ObjectDataSource to get data from BLL and bind data to data-bound controls such as FormView and GridView.
  • Business Logic Layer - BLL, to access DAL on one side and Object data source on the other side.
  • Data Access Layer - DAL, to access database.

Steps to download, deploy and run this project

The following are the steps to related to be taken to run the existing part of the application. This project makes use of membership feature of ASP.NET. So,we have to configure the website using ASP.NET Configuration tool as explained below.
  1. Download timetracker.rar and unzip it into any directory in your system. For example, if you extract to c:\ then it will create a directory c:\timetracker. The download contains all ASP.NET pages but it has NO DATABASE. We have to create database objects using ASP.NET configuration tool manually.
  2. Open Visual Studio.NET 2008 or Visual Web Developer 2008.
  3. Open the project from the directory into which you extracted project.For example, c:\timetracker
  4. Select Website->ASP.NET Configuration option
  5. Select Security tab
  6. Select Use the security Setup Wizard to configure security step by step.
  7. Select From Internet option in Step 2
  8. Click on Next button in the remaining screens and finally click on Finish.
  9. It create a database called ASPNETDB.MDF with required tables and other database components
  10. Open the database in Server explorer or Database Explorer and create tables - PROJECTS, PROJECT_MEMBERS and TIMEENTRY. The structure for these tables is shown below. PROJECT and PROJECT_MEMBERS tables refer to USERID column of ASPNET_USERS table, which is created by Configuration Tool.

    PROJECTS Table

    Column Name Data Type Remarks
    id int Identify Column
    title varchar(50)  
    description varchar(1000)  
    createdon datetime  
    creatorid uniqueidentifier References USERID column in ASPNET_USERS table
    estduration int  
    manager uniqueidentifier References USERID column in ASPNET_USERS table

    PROJECT_MEMEBRS table

    Column Name Data Type Remarks
    projectid int References ID column in PROJECTS table
    userid uniqueidentifier References USERID column in ASPNET_USERS table
    Note: PROJECTID and USERID together make up composite primary key for PROJECT_MEMBERS table.

    TIMEENTRY table

    Column Name Data Type Remarks
    entryid int Identify Column
    projectid int  
    userid uniqueidentifier  
    entrydate datetime  
    createdon datetime  
    duration int  
    description varchar(1000)  
    Note: PROJECTID and USERSID reference PROJECTID and USERID of PROJECT_MEMEBRS table. It is a composite foreign key.
  11. Create the following stored procedure in the database.
    CREATE PROCEDURE dbo.CreateProject(@title  varchar(50),
    @description varchar(1000),
    @creatorid uniqueidentifier,
    @estduration int,
    @managerid uniqueidentifier)
    AS
        insert into projects values(@title,
        @description,getdate(), @creatorid,@estduration,
        @managerid)
    

    CREATE PROCEDURE dbo.GetAllProjects
    AS
    select * from projects order by id;    
    
    CREATE PROCEDURE dbo.GetAllUsers
    AS
    select  u.userid, u.username, m.email, m.createdate
    from   aspnet_users  u  join  aspnet_membership m
    on ( u.userid = m.userid)
    order by u.username
    

    CREATE PROCEDURE dbo.GetNonMembersOfProject(@projectid int)
    AS
    
     select userid, username from aspnet_users
     where  userid not in (
     select userid from project_members
     where projectid = @projectid)


    CREATE PROCEDURE dbo.GetProjectDetails
    (@projectid int)
    AS
      select p.id, p.title, p.description, p.createdon,
      p.estduration,  u.username
      from projects p  inner join  aspnet_users u
      on (p.managerid = u.userid) 
      where  p.id = @projectid       
    

    CREATE PROCEDURE dbo.GetProjectMembers(@projectid int)
    AS
     select userid, username
     from aspnet_users
     where userid  in 
       (select userid from  project_members
        where projectid = @projectid);
    

    CREATE PROCEDURE dbo.GetTimeEntriesByProject
     (@projectid int)
    AS
       select  t.entryid, t.entrydate, t.duration, t.description, t.createdon, u.username 
       from  timeentry t inner join aspnet_users u
       on ( t.userid = u.userid)
       where  t.projectid  = @projectid


    CREATE PROCEDURE dbo.AddMemberToProject(@projectid int, @userid uniqueidentifier)
    AS
       insert into project_members values(@projectid, @userid);
       
    
    CREATE PROCEDURE dbo.AddTimeEntry(@projectid int,@userid uniqueidentifier,@entrydate datetime,@duration int,@description varchar(1000))
    AS
      insert into timeentry values(@projectid,@userid,
      @entrydate, getdate(), @duration,@description)
       
    
  12. Goto Solution Explorer and make login.aspx the startup page.
  13. Run project from Visual Studio.NET 2008 or Visual Web Developer 2008.
  14. You should see login.aspx page.

Website to store photos - Photos.Com free asp.net project with source codes

Website to store photos - Photos.Com  free asp.net project with source codes

This website allows users to create web albums and upload photos into albums. It was developed using ASP.NET 3.5 and SQL Server 2005 express edition as the back-end. Code is written in C#.

This application uses ASP.NET pages for presentation. ObjectDataSource is used to get data from Data Access Layer (DAL) and bind data to ListView.  It uses membership for membership related operations such as registration, login etc.

The following are major activities in this application.

  • User Registration
  • Login
  • Change Password
  • Password Recovery
  • Creation of Album
  • Uploading photos into album
  • Showing photos of an album
  • Deletion of album
  • Showing a photo
  • Editing photo details
  • Deleting photo
  • Search for photos based on title or tags
  • Share album with friends

Technologies and Products Used

  • ASP.NET 3.5
  • C# language
  • Visual Studio.NET 2008
  • SQL Server 2005 Express Edition
  • ADO.NET
  • Login controls - Membership
  • Stored procedures.
  • Identify columns for auto increment columns
  • Master pages and Themes
  • FormView, ListView and DataPager controls
  • ObjectDataSource to get data from DAL and bind data to data-bound controls such as FormView and ListView.
  • Data Access Layer - DAL, to access database.

Steps to download, deploy and run this project

The following are the steps to related to be taken to run the existing part of the application. This project makes use of membership feature of ASP.NET. So,we have to configure the website using ASP.NET Configuration tool as explained below.
  1. Download photos.zip and unzip it into any directory in your system. For example, if you extract to c:\ then it will create a directory c:\photos. The download contains all ASP.NET pages but it has NO DATABASE. We have to create database objects using ASP.NET configuration tool manually.
  2. Open Visual Studio.NET 2008 or Visual Web Developer 2008.
  3. Open the project from the directory into which you extracted project.For example, c:\photos
  4. Select Website->ASP.NET Configuration option
  5. Select Security tab
  6. Select Use the security Setup Wizard to configure security step by step.
  7. Select From Internet option in Step 2
  8. Click on Next button in the remaining screens and finally click on Finish.
  9. It create a database called ASPNETDB.MDF with required tables and other database components
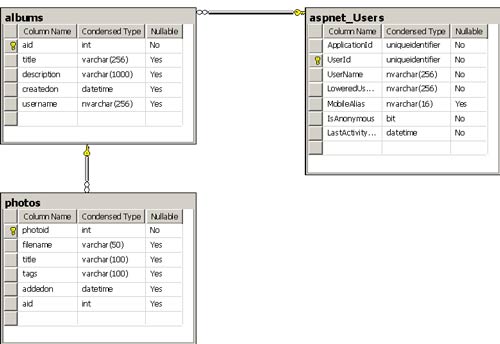
  10. Open the database in Server explorer or Database Explorer and create tables - ALBUMS and PHOTOS. The structure is shown in the picture below. ASPNET_USERS table is already created by ASP.NET. The rest of the tables are to be created. AID in ALBUMS table and PHOTOID in PHOTOS table are identity columns.
    Following diagram shows the tables used in the application. ASPNET_USERS is a table created by membership of ASP.NET. You have to create ALBUMS and PHOTOS.
    Before you create these tables, create a unique index on USERNAME column of ASPNET_USERS table so that it can be used as parent key from ALBUMS table.
  11. Create the following stored procedure in the database.
    CREATE PROCEDURE dbo.CreateAlbum
    (
     @username nvarchar(256),
     @title varchar(256), @description varchar(1000) 
    )
    AS
       insert into albums (username,title,description,createdon)
          values(@username,@title,@description, getdate())
    
    
    CREATE PROCEDURE dbo.Get_Album_Details
    (
    @aid int
    )
    AS
     select a.aid,a.title,a.description,createdon, 
           count(photoid) nophotos, 
           isnull(min(photoid),0) firstphoto
     from  albums a left outer join   photos p
     on  a.aid = p.aid  
     where  @aid = a.aid
     group by a.aid,a.title,a.description, a.createdon
     
    
    CREATE PROCEDURE dbo.GetAlbums 
    (
    @username nvarchar(256)
    )
    AS
     select a.aid,a.title,a.description, 
            count(photoid) nophotos, 
            isnull(min(photoid),0) firstphoto
     from  albums a left outer join   photos p
     on  a.aid = p.aid
     where  @username = a.username
     group by a.aid,a.title,a.description


    CREATE Procedure AddPhoto 
    (
    @aid int,
    @filename varchar(100), 
    @title varchar(200), 
    @tags varchar(100),
    @photoid int output
    ) 
    AS
      insert into photos values(@filename,@title,@tags,getdate(),@aid);
      select @photoid =  @@identity;
      
    
    CREATE PROCEDURE dbo.DeleteAlbum
    (
     @aid int
    )
    AS
       begin tran
       
       delete from photos where aid = @aid;
       
       if @@error <> 0 
         begin
            rollback transaction
            raiserror('Could not delete photos from album',15,1);
            return;
         end;
    
       
       delete from albums where aid = @aid;
       
       if @@error <> 0 
         begin
            rollback transaction
            raiserror('Could not delete album',15,1);
            return;
         end;
      
     
       commit transaction;


    CREATE PROCEDURE dbo.Get_Photo_Details
    (
    @photoid int
    )
    AS
      select  title,tags,addedon from photos
      where photoid = @photoid;


    CREATE PROCEDURE dbo.GetPhotoIds
    (
    @aid int
    )
    AS
      select photoid from photos where aid = @aid;
    
    
    CREATE PROCEDURE dbo.GetPhotosFromAlbum
    (
    @aid int
    )
    AS
      select  photoid, title, tags, addedon 
      from  photos
      where aid = @aid
      order by photoid
    
    
    CREATE PROCEDURE dbo.SearchForPhotos
    (
    @pattern varchar(100)
    )
    AS
      select * from photos
      where  title like '%' + @pattern + '%' or tags like '%' + @pattern + '%'
      order by aid desc, photoid desc
    
    
  12. Goto Solution Explorer and make login.aspx the startup page.
  13. Run project from Visual Studio.NET 2008 or Visual Web Developer 2008.
  14. You should see login.aspx page.

Social Networking Website - Friends.Com free asp.net project with source codes

Social Networking Website - Friends.Com  free asp.net project with source codes

This website allows users to register, add other members as friends and create and join communitites. It provides scrapbook for each user and other typical features like change profile, change password etc. The following are major activities in this application.
  • User registration
  • Login
  • Change password
  • Forgot password
  • Edit profile
  • Change photo
  • Search for Friends
  • Add a user as friends
  • Viewing scrapbook
  • Sending message to other user
  • Creating communities
  • Search for communities
  • Joinging other communities

Technologies and Products Used

  • ASP.NET 3.5
  • C# language
  • Visual Studio.NET 2008
  • SQL Server 2005 Express Edition
  • ADO.NET
  • Login controls - Membership
  • Stored procedures and trigger
  • Master pages and Themes
  • Gridview, DetailsView, FormView, DataList and SqlDataSource controls
  • ListView control

Steps to download, deploy and run this project

The following are the steps to related to be taken to run the existing part of the application. This project makes use of membership feature of ASP.NET.So, we have to configure the website using ASP.NET Configuration tool as explained below.
  1. Download friends.zip and unzip it into any directory in your system. For example, if you extract to c:\ then it will create a directory c:\friends. The download contains all ASP.NET pages but it has NO DATABASE. We have to create database objects using ASP.NET configuration tool manually.
  2. Open Visual Studio.NET 2008 or Visual Web Developer 2008.
  3. Open the project from the directory into which you extracted project.For example, c:\friends
  4. Select Website->ASP.NET Configuration option
  5. Select Security tab
  6. Select Use the security Setup Wizard to configure security step by step.
  7. Select From Internet option in Step 2
  8. Click on Next button in the remaining screens and finally click on Finish.
  9. It create a database called ASPNETDB.MDF with required tables and other database components
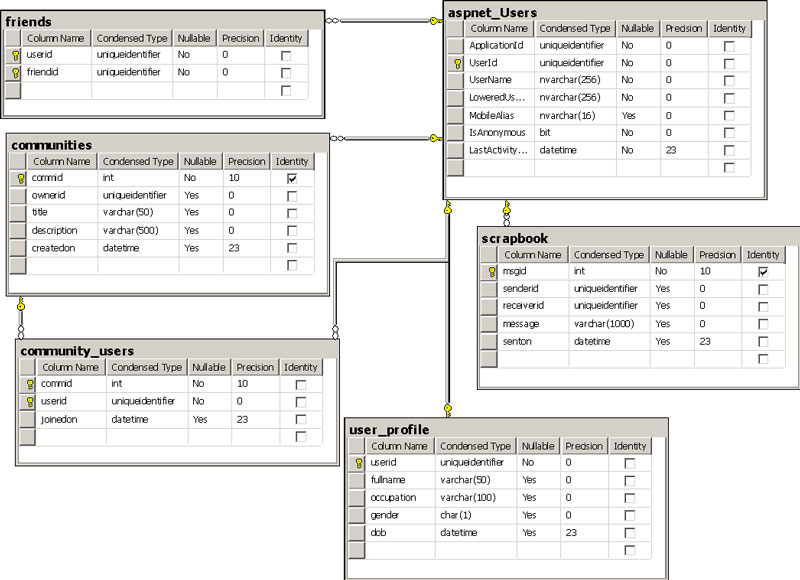
  10. Open the database in Server explorer or Database Explorer and create tables - USER_PROFILE, COMMUNITIES, COMMUNITY_USERS, FRIENDS and SCRAPBOOK. The structure is shown in the picture below. ASPNET_USERS table is already created by ASP.NET. The rest of the tables are to be created. Column MSGID in SCRAPBOOK and COMMID in COMMUNITIES are identity columns.
  11. While creating table make sure you define Foreign keys as follows.
    Child Table and Foregin Key Parent Table and Parent Key
    USER_PROFILE - USERID ASPNET_USERS - USERID
    FRIENDS - USERID ASPNET_USERS - USERID
    FRIENDS - FRIENDID ASPNET_USERS - USERID
    SCRAPBOOK - SENDERID ASPNET_USERS - USERID
    SCRAPBOOK - RECEIVERID ASPNET_USERS - USERID
    COMMUNITIES - OWNERID ASPNET_USERS - USERID
    COMMUNITY_USERS - USERID ASPNET_USERS - USERID
    COMMUNITY_USERS - COMMID COMMUNITIES - COMMID
  12. Create the following triggers and stored procedure in the database.
    CREATE TRIGGER Trg_insert_row_into_user_profile
    ON dbo.aspnet_Users
    FOR  INSERT
    AS
     declare @userid  uniqueidentifier
     select @userid = userid  from inserted
    
     insert into user_profile 
        values( @userid, null,null,null,null)


    CREATE PROCEDURE dbo.DeleteCommunity(@commid int)
    AS
      begin tran
         delete from community_users where commid = @commid;
         delete from communities where commid = @commid;
      commit tran


    CREATE PROCEDURE dbo.GetFriends(@userid as varchar(50))
    AS
     select  u.userid,u.username,fullname
     from aspnet_users u join  user_profile up
     on  u.userid = up.userid
     where u.userid in (
       select friendid from friends
       where  userid = convert(uniqueidentifier,@userid) );


    CREATE PROCEDURE dbo.GetMessages(@userid as varchar(50))
    AS
     select  msgid,userid,username, message, senton
     from aspnet_users u join scrapbook s
     on  u.userid = s.senderid
     where  s.receiverid = @userid
    

    CREATE PROCEDURE dbo.GetUserDetails(@userid varchar(50))
    AS
      select u.userid, username, fullname, occupation, 
          gender = case gender 
            when  'm' then 'Male'
            else 'Female'
           end,
          dob = convert(varchar(10), dob, 3)
      from  user_profile up join aspnet_users  u
      on  up.userid = u.userid
      where   u.userid = convert(uniqueidentifier,@userid);
    

    CREATE PROCEDURE dbo.SearchFriends(@name as varchar(30))
    AS
     select  u.userid,username,fullname 
     from  aspnet_users u join  user_profile up
     on  u.userid = up.userid
     where  username like '%' +  @name + '%' 
       or  fullname like '%' + @name + '%';


    CREATE PROCEDURE dbo.SendMessage(@fromuserid uniqueidentifier,@touserid uniqueidentifier,
     @text varchar(2000) )
    AS
        insert into scrapbook
           values(@fromuserid,@touserid,@text,getdate());
           
    
  13. Goto Solution Explorer and make login.aspx the startup page.
  14. Run project from Visual Studio.NET 2008 or Visual Web Developer 2008.
  15. You should see login.aspx page.

Internet Banking free asp.net project with source codes


Internet Banking  free asp.net project with source codes

This web application provides Internet Banking facility to customers of a Bank. First an account holder must register for Internet Banking facility at the branch where he/she holds an account. Then bank provides password using which he/she can access Internet Banking facility.
This project doesn't use ADO.NET and instead it uses LINQ to access SQL Database. It also uses LINQ with stored procedures and LINQDataSource.
The following are important characteristics of this project:
  • User logs in using account number and password provided by bank
  • User can change password
  • User gets summary of Account - current balance
  • Most recent 5 transaction done by the account
  • Funds can be tranfered to other accounts of the same bank
  • Funds can be tranfered only to registered payees, so payees are to be registered
  • Search for transactions based on dates
  • Make a request for cheque book

Technologies and Products Used

  • ASP.NET 3.5
  • C# language
  • Visual Studio.NET 2008
  • AJAX
  • LINQ
  • SQL Server 2005 Express Edition
  • Security
  • Stored procedurs

Steps to download, deploy and run this project

The following are the steps to related to be taken to run the existing part of the application:
  1. Download ibank.zip and unzip it into any directory in your system. For example, if you extract to c:\ then it will create a directory c:\ibank. This download contains all that is required for project including database. Note: This project uses Ajax Control Toolkit, but it doesn't provide the AjaxControlToolkit.dll. So make sure you place AjaxControlToolkit.dll in BIN folder of the project.
  2. Open Visual Studio.NET 2008 or Visual Web Developer 2008.
  3. Open the project from the directory into which you extracted project.For example, c:\ibank
  4. Goto Solution Explorer and make login.aspx the startup page.
  5. Run project from Visual Studio.NET 2008 or Visual Web Developer 2008.
  6. You should see login.aspx page.

Knowledge Management System free asp.net project with source codes

Knowledge Management System  free asp.net project with source codes

This web application is aimed to allow students in a college or employees in an office to share there knowledge by uploading documents such as PDFs, PPTs etc. The following are major activities in this application.
  • User registration
  • Login
  • Change password
  • Forgot password
  • Adding a post
  • Editing and deleting posts
  • Searching for posts
  • Providing rating for an existing post
  • Viewing details of a post and downloading it

Technologies and Products Used

  • ASP.NET 2.0
  • C# language
  • Visual Studio.NET 2005
  • SQL Server 2005 Express Edition
  • ADO.NET
  • Login controls
  • Stored procedures
  • Site navigation - Treeview, Sitemap etc.
  • Master pages and Themes
  • Gridview and SqlDataSource controls

Steps to download, deploy and run this project

The following are the steps to related to be taken to run the existing part of the application. This project makes use of membership feature of ASP.NET.So, we have to configure the website using ASP.NET Configuration tool as explained below.
  1. Download kms.zip and unzip it into any directory in your system. For example, if you extract to c:\ then it will create a directory c:\kms. The download contains all asp.net pages but it has NO DATABASE. We have to create database objects using ASP.NET configuration tool as well as manually.
  2. Open Visual Studio.NET 2005 or Visual Web Developer 2005.
  3. Open the project from the directory into which you extracted project.For example, c:\kms
  4. Select Website->ASP.NET Configuration option
  5. Select Security tab
  6. Select Use the security Setup Wizard to configure security step by step.
  7. Select From Internet option in Step 2
  8. Create a new user in Step 5
  9. Click on Next button in the remaining screens and finally click on Finish.
  10. It create a database called ASPNETDB.MDF with required tables and other database components
  11. Open the database in Server explorer or Database Explorer and create tables - KMS_CATEGORIES and KMS_POSTS. The structure is shown in the picture below. ASPNET_USERS table is already created by ASP.NET. It is shown as it is parent table for KMS_POSTS.
    Create the following stored procedure in the database.
    CREATE PROCEDURE dbo.RecentTenPosts
    AS
       select  top 10 pid, title, description, cid, cname,filename,
       case filename 
        when '' then null
        else ltrim(str(pid,5) + '_' + filename)  end  as PhysicalFilename,
        postedon, postedby , username, Rating = (excellent * 5 + good * 4 + average * 2 + poor * 1)
                     / case excellent + good + average  + poor
                        when 0 then 1
                        else   excellent + good + average + poor
                       end 
        from  kms_posts p inner join kms_categories c
        on  p.category = c.cid  inner join aspnet_users u
        on  p.postedby = u.userid
        order by pid desc
    
  12. Goto Solution Explorer and make login.aspx the startup page.
  13. Run project from Visual Studio.NET 2005 or Visual Web Developer 2005.
  14. You should see login.aspx page.

Patients Information System free asp.net project with source codes


Patients Information System  free asp.net project with source codes

This application allows a Doctor to keep track of his/her patients. It allows Front-office /Doctor to enter the details of patients, visit details, drugs prescribed and test conducted. This application allows Front-office to enter details of drugs and test into database.
Doctor can query patients by name and they get details regarding the patients.
Doctor can get visits history of patients. Doctor can also retrieve drugs used and tests conducted for each visit.

Technologies and Products Used

  • ASP.NET 2.0
  • C# language
  • Visual Web Developer 2005 Express Edition
  • SQL Server 2005 Express Edition

Steps to download, deploy and run this project

The following are the steps to related to be taken to run the existing part of the application:
  1. Download pis.zip and unzip it into any directory in your system. For example, if you extract to d:\ then it will create a directory d:\pis. This download contains all that is required for project including database.
  2. Open Visual Web Developer 2005 Express Edition or Visual Studio.NET 2005.
  3. Open the project from the directory into which you extracted project.For example, d:\pis
  4. Goto Solution Explorer and make default.aspx the startup page.
  5. Run project from VWD 2005 Express Edition or Visual Studio.NET 2005.
  6. You should see default.aspx page.

ShareBooks.com free asp.net project with source codes


ShareBooks.com  free asp.net project with source codes

This is an internet website, which allows users to share ebooks that they have with users of the website.
Users must register to upload books. However, users can browse, search and download books without any registration or login.
It allows users to rate books to provide feedback about books to other users.
It provides typical user related operations like login,change password, register, forgot password etc.
It also provides a web service, which provides details of books and users to other business associates.

Technologies and Products used

  • ASP.NET 2.0
  • C# language
  • Visual Web Developer 2005 Express Edition
  • SQL Server 2005 Express Edition
  • Mail Server - CMail Server

Steps to download, deploy and run this project

The following are the steps to related to be taken to run the existing part of the application:
  1. Download ShareBooks.ZIP and unzip it into any directory in your system. (For example if you extract to d:\ then it will create a directory d:\ShareBooks)
  2. Open Visual Web Developer 2005 Express Edition or Visual Studio.NET 2005.
  3. Open the project from the directory into which you extracted project.For example, d:\sharebooks
  4. Goto Solution Explorer and make login.aspx the startup page.
  5. Run project from VWD 2005 Express Edition.
  6. You should see login.aspx page.

YourBlogs.com free asp.net project with source codes


YourBlogs.com  free asp.net project with source codes

This is a website that allows users to read and post their blogs. Only registered users can post blogs. Blogs can be deleted and modified by users. Unregistered users are allowed to search, read and comment on the blogs.
Regular features related to users like login, change password, change profile etc. are provided.

Technologies and Products used

  • ASP.NET 2.0
  • C# language
  • Visual Web Developer 2005 Express Edition
  • SQL Server 2005 Express Edition
  • Mail Server - CMail Server

Steps to download, deploy and run this project

The following are the steps to related to be taken to run the existing part of the application:
  1. Download yourblogs.ZIP and unzip it into any directory in your system. (For example if you extract to d:\ then it will create a directory d:\yourblogs)
  2. Open Visual Web Developer 2005 Express Edition or Visual Studio.NET 2005.
  3. Open the project from the directory into which you extracted project.For example, d:\yourblogs
  4. Goto Solution Explorer and make login.aspx the startup page.
  5. Run project from VWD 2005 Express Edition.
  6. You should see login.aspx page.